1 Like
MissClue: Cruise Most Deadly Walkthrough!

Cruise Most Deadly Walkthrough!
As usual, Cruise Most Deadly starts off with Jane writing a letter to Nixie. (Love listening to these letters!) So, you don't have to listen to the letter, because usually you don't need any information in the introduction letters to help solve anything. But you still have to wait until the letter is done.
After being shown the map of where the ship has been sailing, Evelyn will walk down the stairs and will show you that she has gotten a cut. Eveyln will ask if you can help her heal the cut. So we will play a good Jane Darcy and will go fetch the first-aid kit. The first-aid kit is pretty easy to find if you ask me, just click on the drawers to the left of the stairs.
Click on the top drawer, or should I say cabinet, and move the blankets. Then grab the first-aid kit and put the blankets back afterwards, which happen to look extremely comfy...
Then go and click on Evelyn, she should be sitting on the blue couch. After, put down the kit and open it. The first thing Evelyn needs for her cut is iodine. The iodine should be the bottle at the top of the kit. Get the bottle and open it, then put it on Evelyn's cut. It will sting her, ouch, so she will start blowing it.
After that, you will need to get bandages for Evelyn. You will need two materials for this. Cloth, and the thing that holds down the cloth. (The material for holding down the cloth should look like a tape roll.) When you have gathered this, place them onto the cut. Evelyn is not yet steady enough to return to the deck, so you and Evelyn will play a fun game of checkers! The checkers isn't anything you have to solve, just a fun game with Evelyn.
Return the first-aid kit where you found it before you play, and then click on one of the two doors in front of the couch area. Click on Evelyn again and then start playing checkers! Do whatever moves you want to, it won't matter. You just have to play until Evelyn says "That was a good game!" Who will win the game, you ask? You'll have to find out!
You will, or Jane will, decide to get some drinks before going onto the deck with Evelyn. So, leave the room and go to the kitchen. Open the cabinets and get three cups. One for you, one for Evelyn, and one for Evelyn's Dad, or the Captain of the ship!
Click on the counter and click on the wooden tray and then put the cups on it. You would think that the next step is to get drinks from the fridge, right? WRONG! Before you have a chance to, the boat starts to shake and Evelyn says to hold on tight! If I were you, I would listen! The boat begins to shake and you hear a Crash! Evelyn then yells down to you everything is fine they just had to steer around a log! The Crash you heard were the glasses falling into the sink (thanks goodness they aren't broken!)
Drinks:
You need to get the lemonade from the refrigerator, the glasses from the sink, and put everything on the tray
Once you have the drinks made you need to bring them on deck and set them on the table. After that you have a conversation with Mr. Berkeley and take hold of the wheel while he goes and checks the engine.
Steering puzzle:
You need to keep the ship at 285 in-order to keep the ship on course. Click and drag the wheel left and right to turn the boat, you need to keep the dial between the W arrow and the NW arrow as shown below:

After you keep the ship on course for a while a storm comes and Mr. Berkeley comes up with Evelyn and takes over, asking you to secure everything, check the ports, turn on the bilge pumps and switch the left tank to the right.
Ports:
There are three ports you need to close, and they are all located between the two cabinets

Engine room:

Bilge pumps:
In the engine room there are three bilges pumps you need to turn on, just flip the switches and you are good to go

Tanks:
The lever to switching the tanks is stuck, so you need to oil it. the oil can, can be found in the cabinet to the left of the stairs
on the top shelf. Pick up the oil can and use it on the lever, it will then turn

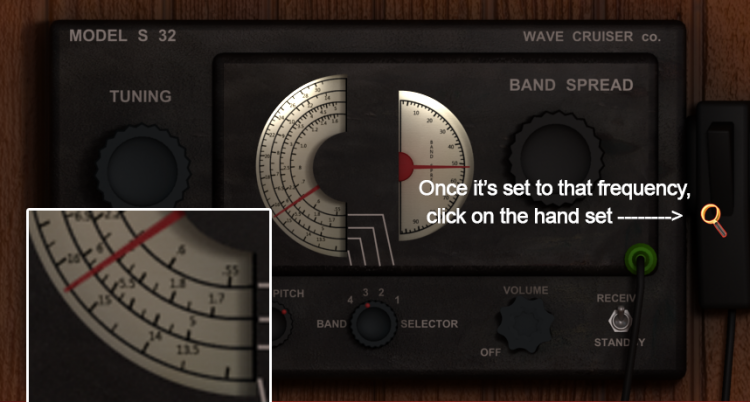
When you come from the engine room, Evelyn will call down and ask that you set the radio to 11 7 25 to do this you need to first, go to the radio, then turn in on by clicking and dragging the far right volume knob. After that set the middle knob to band 3 (same thing click and drag) and then last use the large far left tuner knob to set the frequency. Turn it until the needle is in the upper left corner:

Items to pick up while securing:
You need to get:
The Swiss knife from the drawer under the first aid kid
The crackers and bracelet from behind the sink
The basket off the counter
The Book on Australian animals
The lighter in the cabinet to the right of the snail statue
The flashlight and Morse code book from your suit case


After this you need to get you rain gear out from under you bed!

The storm is raging outside and just as you are getting your rain gear the boat suddenly jerks violently and you hit your head falling unconscious. Slowly you open your eyes and darkness surrounds you except for a small thin light line, click on the top light line, the room brightens and you see all the mess!
Look around the galley, I did search the galley and bunk room, found a rope that Jane says this will come in handy in one of the storage areas but could not place in inventory so will remember where that is for later. Go up the stairs to the deck, turn around and go towards the front of the boat on the side. You will see the island, look on the right side of the boat until you find a rock that you can climb down to the beach on click on it and then go down.
Look around the beach and explore for Evelyn and Mr. Berkeley, they have to be somewhere!
After exploring the beach, its time to begin the exploration of the jungle... dun dun dun. As you venture in, you think you hear something on the left and go to investigate. Just as your are making your way along the humid jungle path suddenly you step into something, a snare! You are hoisted high and flipped upside down hanging from a tree by your foot, oh my! But it gets worse, there is a giant snake who seems to think you look like a nice lunch, gliding effortlessly towards you!
You are now hanging upside down with the uncertain fate of being eaten by a huge snake!
Fun fact:
You can look down and pick up some rocks and throw them at the snake but it will do nothing
Spoiler:


You need to get your handy Swiss army knife and cut yourself loose, then you are free!

After that, you continue your search for Evelyn and Mr. Berkeley until you come to a broken bridge, noticing a rain hat on the other side you are worried for the welfare of both your friends and are determined to get across the other side.
You first need to get the rope from the boat:


After that you bring the rope to the bridge and:
click on the rope again to bring it up in the forefront, and cut a piece off using your Swiss Army Knife!


Once you've got your piece of rope cut, Jane will tie a loop in one end, and toss it down! It's up to you to catch the board, by clicking on the rope and swinging it back and forth!


Once you've got the board tied off, you need to straighten the pole near the edge of the cliff, and then tie the rope off, like this:
Then, you need to cut another piece of rope, and tie off the hand rail, like this:
Once the bridge is fixed you cross it and find that the rain hat, is old and doesn't belong to Evelyn,

(Fun fact, the trees around the hat are eucalyptus leaves!)
You continue into the jungle:


It starts to rain and while crossing a bridge you slip and slide into a mysterious cavern with a wonderful pool!


You sit down to rest before exploring if for a way out, and have a dream about being a beautiful mermaid, you comb your hair then dive in and swim to the surface!
When you awaken you discover the comb from your dream and dive into the pool to see if the way out is the same as in your dream:


It turns out to be true and you swim to the beach, where the setting sun has turned everything orange. You want to get back to the boat before it gets dark and the quickest way is to move a boulder blocking a natural arch:
Pick up one of the rocks:


Then bring it over, and place it in front of the large boulder!


Then, go back to the shipwreck, and find a nice beam that you can use as a lever!


Once you're back at the boat you change out of your wet clothes and explore the rest of the ship:


After reading the journal you find that Evelyn and Mr. Berkeley are not on the island and you are quite alone....
After a while you decide to clean up cleaning everything up after the ransack.
If you turn around the smugglers also broke a couple of tubes in the radio so it won't work
you decide to go exploring to the cave, going under the rock and and past the old shipwreck:

Before you enter the cave you look up to see an old wind generator. It's very dark inside so you get out your flashlight and the bulb breaks! The only option is to feel your way along the right side of the cave until you come to a lighted switch panel!
You need to flip the one all the way to the right, that turns on all the lights and you can now explore the cave without worry!
If you turn around you will find a door to an old store room with some items you can pick up:

water can - counter - Crank

If you leave the store room and travel further into the cave you will discover several locked doors and also a vine covered doorway into an enchanting grotto! If you explore the area you will find a generator with several missing pieces! You're are intrigued and want to see if you can get it working to see what it runs!
Things needed:
Water
Spark plug wires
Gas
Motor/fan Belt
and crank
The Gas Can is located here:


This is the way out of the grotto:

and you can find the belt and wires here:

After collecting the gas Can you need to fill it by going back to your boat and down to the engine room! (don't forget to turn off the lights and also find Evelyn's bandage, Poor Evelyn!)


Now you should have everything you need! Also, if you explore the jungle you can look at the rope that caught your foot continue into the jungle a little more, cross the bridge and see that something has been eating the eucalyptus leaves, and that the river is higher after the rain!
Okay now back to the grotto to fix the engine!
You need to put the gas in, you can click it before you do and it tinks, so that is how you know it needs gas)

The wires taking them out of your inventory from left to right:

then put on the fan belt and water:

You can get the water from here:

Once everything is done go around to the side and put the crank on and try it out!

After you crank you hear a large explosion and blue smoke bellows out!
uh oh!! Maybe we did something wrong! I hope Jane is okay and that her hair didn't catch fire!!
The smoke clears we discover everything is good and our hair is not on
fire! After backing up you can explore the panel to the right, flip
all switches you see there.

Then back up again and turn around until you see some light behind some bushes.
Move those and go down to a cave area.


Go
over to a stand and open the lid, there is a book about the transport
system and some switches. Flip the bottom switch to the left, and the
upper left switch up and press the red button!

A
mysterious cart comes rolling in and you back up and move closer to
investigate. Opening the door and getting in you discover the lever is
stuck and needs oil. Get out the oil can and oil the lever then push it
forward.

You go on a pretty cool ride and wind up on a beach on the other side of the island.
fire! After backing up you can explore the panel to the right, flip
all switches you see there.
Then back up again and turn around until you see some light behind some bushes.
Move those and go down to a cave area.
Go
over to a stand and open the lid, there is a book about the transport
system and some switches. Flip the bottom switch to the left, and the
upper left switch up and press the red button!
A
mysterious cart comes rolling in and you back up and move closer to
investigate. Opening the door and getting in you discover the lever is
stuck and needs oil. Get out the oil can and oil the lever then push it
forward.
You go on a pretty cool ride and wind up on a beach on the other side of the island.
Hop out of the cart and explore all over! You can find, goggles, map of
Australia, a snake crate (remember him?) and another crate marked
sanctuary!

After that go back to the cart and turn it around be looking down and flipping the lower lever and clicking the top.

Then
jump in again and go on a wicked ride! You get back to the first room
and the engine stops. Such a bummer! You find out you need more gas by
clicking on the red gas tank.

Head back over to the boat and refill it then go back to the gas tank and pour the gas in again.


Start
the engine with the red crank, go down to the stand and double flip the
lever to get the cables going again. Then run over to the cart and
start it up! WHEE you go on another ride!

Australia, a snake crate (remember him?) and another crate marked
sanctuary!
After that go back to the cart and turn it around be looking down and flipping the lower lever and clicking the top.
Then
jump in again and go on a wicked ride! You get back to the first room
and the engine stops. Such a bummer! You find out you need more gas by
clicking on the red gas tank.
Head back over to the boat and refill it then go back to the gas tank and pour the gas in again.
Start
the engine with the red crank, go down to the stand and double flip the
lever to get the cables going again. Then run over to the cart and
start it up! WHEE you go on another ride!
The cart stops, you get out to see a new area with another stand, a door and some steps...:O

the
door is locked so you go up the steps and open the doors. You see the
sky and head out. Then you see.....THE LIGHT HOUSE! Such a long time of
wanting to see it and it's here! you run over to hug it but find the
door locked!

Then something terrible happens!
Will you escape?!


the
door is locked so you go up the steps and open the doors. You see the
sky and head out. Then you see.....THE LIGHT HOUSE! Such a long time of
wanting to see it and it's here! you run over to hug it but find the
door locked!
Then something terrible happens!
Will you escape?!
Stones begin to fall from above! Click with the down arrow immediately to get out of way of falling rocks. If you get hit with the falling rocks you will get "Another Chance "
Once the stones are clear and you are safe you will see the the door is locked. Go back to the mine cart tunnel and turn the mine cart to return to the correct spot in the tunnel, remember to use lever on the bottom of the cart as we did before to change it to move in the correct way, get out of the cart, go up the stairs to the beach there.
Go towards the beach and look around in the bushes and shrubs, you will see a light, go follow the path to a stream. Once at the stream you won't be able to cross so you turn back and look around the ground to find wooden planks in the forest. Use the wooden planks to make it across the stream behind you walk across the planks, go through the woods until you come to the rope bridge you built previously look on the ground you will see a broken branch with leaves, pick them up and store in inventory.
Return to generator to turn it off, to turn the generator off look on the side where the crank is, right above the crank is a small spot, inside that, is a button you can use to turn the generator off (sound helps if u have to make sure it is off)
Leave generator and go back through the vines at the waterfall, go down the cave to the control panel with the light switches. Turn off lights, BUT before you turn off the lights, look around on the ground, you should find a red and white checker piece! Pick up checker piece then turn off lights, and return to the beach where the boat is. (night scene on beach)
Go inside the boat and you should find a koala sitting on the couch area! Click on him and then on his ID tag. Check your inventory and give the koala some leaves! As he eats the leaves, read the Australian animal book in your inventory.
After reading the book, click on the koala, you will be able to pick him up and take him to bunk room. Take the branch from your inventory and place on the table in the bunk area ( where the checker game was previously), put the koala on branch move around room and then click on your bunk to sleep.
Next after you wakeup click on the koala to carry him with you, leave the boat and return to the jungle near the boat take the right side path and follow it to cross the rope bridge. Go straight then right, then straight to stream you were at before and set planks to cross it, cross the planks, go back to the generator.
Re-start the generator (use crank) then go down the stairs that you used before to go to the cart, once again turn cart around and hop in to go for another ride! Once it stops follow the stone steps to the Lighthouse.
Once at the Lighthouse, look toward the left, you will see a tree to place your koala in. Once in the tree your Koala, or Jakkapoe will scoot up tree toward the top of Lighthouse (meanwhile find your animal crackers in inventory might as well have a snack yourself while waiting but not necessary)
Jakkapoe eventually returns outside and gives you some keys (they show in inventory)
use those keys and enter the Lighthouse. Its time to explore! Just as you are beginning your exploration you suddenly fall through a trap door! Before you can get your bearings you hear the footsteps of 2 men then silence and then you over hear a strange conversation!
Once the men gone, use your flashlight from your inventory and look around the room, you should find a map on the floor, then find a tunnel with a locked door.
Luckily you have some keys and you use the keys in your inventory to unlock the heavy door. (when you pick up the keys flip though them until all keys are on the left side of ring, then click one more time, that key will open door)
Exit the door, go back to the cart (don't get in it) turn around in room until you are able to go up the stairs again to go outside the Lighthouse. Enter the Lighthouse using a large key (again put them all on the left and this time move three keys back)
Enter and finish your exploration of the Lighthouse (floor you fell through previously is now locked)
Go up the stairs to the wooden door on your right, look around the table in room read the newspapers and notes ( notes on right side of table) Then leave that room, go right and continue upstairs then up the ladder to top of the Lighthouse, look all around then Read manual on SuperNova Lighthouse Beacon. (I made note of the directions might need for future )
Open valves acetylene & oxygen tanks
Then light pilot light
Radio receive on Transmitter to 101.8
Press telegraph key three times quickly
Works 2 miles
Then take the key from the table and go back downstairs and leave the Lighthouse. Outside you see the entry to the tunnel go down the steps to the cave, return to the cart, turn the cart around as we have done in past and return to the area where you can go outside to the grotto (the waterfall and vine/generator area)
Turn the generator off by pushing button above the crank. (generator sound stops if you got the right spot) Go through th vine covered tunnel (straight about 3 times) you should see cave room with bed rolls on floor on right!
Enter the cave room and turn until you find a door. Use your handy dandy key ring to find a key that opens that door. (again start with all keys on left side and clicked six times) enter room look inside to see the fuel in barrels and find a crowbar on the right hand side (store it.)
Leave the storage room and then exit bedroll room, go to the room where the switches and tables are. Find another checker on floor around the same place you found the last one. (right side on floor)
Enter the tool room and go to the brown crates use the crowbar in your inventory to open them. My, my, what do we have here?
Return to the main room with the switches, use the Key you found in the Lighthouse on the door to the left of the power switches thats the captains quarters!
Enter the room and look around! Possible things to find:
On the desk top: map & book Mr. Berkeley's Unknown riches of the Philippines.
On the dresser top/drawer: drawers are empty but top has 2 boxes one with pearls and one with gems also an eye-patch.
Night stand with book and candy.
wooden box: Take black thing inside
Cloth covered trunk: book on rappelling (A good read)
You set Jakkapoe on the captain's bed to eat some crackers, you hear clinking noises, and then Jakkapoe finds a ball and wants to play with you! (he's so cute)
Once you're finished playing, the Koala goes and puts the ball back and finds a key for you!
You take the key and Jakkapoe, turn off both the generator and the lights then head back to the boat and make a sandwich! Don't forget the spooky noise on the way :Oo
To make a sandwich go over to where you made the lemonade and click. Notice the Marmite has Yeast extract written on it!
After you make your delicious sandwich you pick up Jakkapoe, and head off to bed! Put Jakkapoe on his branch and then click on your bunk
Once you wake up you pick up Jakkepoe, and head off to the cave! (you can make another sandwich if you like) There are two ways you can go now, you can go by way of the jungle and bridge because you can use your flashlight to go through the tunnel and turn on the lights! Or you can go the normal way!
After you turn on the lights you can find ANOTHER checker on the ground! (how odd)

Then you take your brand new key and see if it opens the door in the tunnel! It turns out it does and you go inside to explore every corner!
You find a map on the table with the location of the island you're on, you find a crate with Japanese words on them, and you find a table with a chemistry set!


You can't read the Japanese but you know of a Japanese pirate book so you head off to read all it has to offer! (I loved reading it)


While reading you find an ancient recipe for 'dream gas'
You need:
Acetone
Wax
Cinnamon for sweet dreams
Or
Nutmeg for Nightmares!
Water
Yeast Extract
Kava Kava
Feel free to take the book with you, and the repelling book if you so desire!
Now, We all know that it would be incredibly cool to make dream Gas! so let's go on an adventure to find all the ingredients!
First off on our way to the other side of the island we stop by the lab room again to pick up:
A beaker
The kavaKava
Some bottles
And Acetone!


On your way to turn on the generator take your beaker and get some water from the pool. then go down to the cart and restart the cords running by flipping the upper left lever down and then up again.


Then jump in the cart and ride to the other side of the island! YAY! Once on the other side of the island use your handy dandy prybar and open the crate to the right of the snake crate and get candles!


After that, turn the cart around and head back to the grotto, Then go by way of the bridge path to the boat and pick up the Marmite Jar!


Now there are only two more things you need, and then on to make Dream Gas! Stop by the store room on your way to the Lab and pick up Cinnamon and Nutmeg from the crate on the left

You can pick up these items in any order you like, or by any path, this is just one way I thought of doing it!
Now to make Dream Gas! Go back to your chemistry set and Jane should put out the flasks on the counter (this is only if you have everything you need.)

This is the order you need to mix them according to the book:
Kava Kava
Yeast Extract
Cinnamon for sweet dreams
Or
Nutmeg for Nightmares!
Water
Heat, Stir and pour
Wax
Acetone
Place in the Kava Kava, it's the little white box.

Next, place in the Marmite. It's the brown jar.

Then, add either Nutmeg or Cinnamon, (which ever you prefer!)
Then add the water you got from the grotto, in the little beaker!

Next, you'll need to turn on the tank to the right! Hover your cursor to the ride side of the screen, until you see a Side Arrow. Click that, and then rotate the top of the tank!

Then, look beneath the pot, and light the flame with your lighter!

Stir the paste with the glass rod to the left, on the table!

Once the mixture is finished, click on it to pour it into the flasks!

Then take the candles from your inventory, and melt them in the pot.


When it's melted, pour it over the flasks!

We're getting close to the end! Next you'll need to pour the Acetone over the wax.


This is the last step! Push the corks into the tops of the flasks, and you'll be done!

Then you hear a crash behind you, however when you turn around expecting the worst! It turns out to only be jakkapoe having turned over a barrel full of maps!

We examine the maps and learn more detail about the caverns and island we are on.

After that we start up the engine and cable system. Make sure to reset the cables
and turn around your cart
Then ride off to the light house
Tip: you can also get to the light house by going way of the beach
Spoiler:


You use your key and enter the lighthouse ascending the steps to the top. Jane mentions that she would like to see if the lamp is actually portable but would need a wrench in order to do so.

You now have two options, you can walk back to the beach or ride the cart, and go to the store room and get a wrench off the wall, or trot over to the boat and get one from the tool box in the boat!
After you have the wrench you travel back to the light house and go back to the top!

Now it is the delicate business and disconnecting the turning off the tanks and disconnecting the hoses! Make sure to turn off the tanks first or else bad things happen!
Spoiler:
BOOM!
To turn off the tanks click and hold the tops and pull down

Then use the wrench on the hoses!

Once that is all done you take the beacon to the top of the hill and place it on the rocks.

Jane makes an amazing discovery but it wouldn't work with just her on the island so she puts the beacon back.
You reconnect the hoses and turn back on the tanks by clicking and pulling up


After everything is on Jane mentions putting everything back in place so the pirates don't realize she is here! And suggests starting with the captains quarters.


But once you enter you hear the tapping again and discover it is actually SOS
You excitedly get out your Morse code book and go over to the pipe!
You translate the SOS by clicking on the letters in the book. Then you converse with non-other than MR. BERKELEY!! YAY!!
What Mr. Berkeley says in Morse code:
Berkeley
Were you captured
Can you help us
--
Only if you ask about evelyn:
Yes
--
Locked up in big cavern
Thank goodness
No can you come
Found key does not fit anything here
What
What
Mr. Berkeley is locked up and unguarded, but you don't have the key to get to him! He has a key that might work so you send Jakkapoe to get it! (he is so sweet about stealing keys!)
He gets the key and comes back, then you have the option to give him either crackers or leaves!
After you get the key you tell Mr. Berkeley you got it and are coming!
You're about to rescue Evelyn and her dad!! AH! You finally have the key that might open the locked metal doors where the mine cart track ends. The ones you have been wanting to open since you found the light house!
There's only one thing to do! Run as fast as you can to the grotto! Lucky, the generator is on and the cables are running. So all you have to do is turn the cart around and hop in, pushing the lever forward you travel to the light house and then get out of the cart. You take the key and put it in the key hole and it turns, then you flip the switch next to it and the two metal doors open!
You get back in the cart and ride farther down the track. It ends on the side of the cliff like the map:
The door opposite to the cart is locked and none of your keys fit so you look over the cliff. If the map Jane has is right, there should be a cave down there and it's a long way, to rappel! So you get out your rope and use it over the cliff, then tie a figure eight knot around your waist, not forgetting to add in the figure eight descender! (looking at the repelling book is a good idea)
After that find something to tie the rope on to for an anchor, like the end of the tracks! This is really tricky, if you tie it wrong jane will fail to her doom! So make sure to follow the book, go: Under, Over, Under, Over, Under! Then you have one awesome bowline knot!
You repel down the cliff and find a cave! You turn on your flash light and venture into the cave. On your way you find a locked metal door, lucky one of your keys fit! But what you find behind it is less than lucky!
You decide you would much rather explore more of the cave than behind the door. You come to another door, this time a gate and look for key the will hopefully fit. YAY there is!!
Every step you can tell you're getting closer to Evelyn and her dad! You come to a metal ladder and begin to climb up, only to find a stuck hatch at the top! You oil it but it still won't budge, so you decide to go back down and look for things while it soaks in.
You climb down the ladder only to find the tide is coming in! well that changes things, it's time to go back up and see if you can get the hatch open before it's too late!
You go back to the hatch with the water close on your heels! It budges a bit, but not enough to open, you also find the hatch has a key hole, that might work! So you begin to try your keys, but before you can finish the water over takes you!
You're sinking into unconsciousness when the hatch opens and none other than RON Saves you! You may remember
hearing about Ron from previously, especially during the checker game where Evelyn told all about his flying for mail for the mine in Australia! And wanting to buy a new plane!
Okay back on subject Ron tells you when he was flying home to meet Evelyn and his dad in New Zealand, he had to make a forced landing on this island. He explored most of the island when he first crashed but has since not come back to this side of it. You show him where you believe Evelyn and her dad are being held and how you think you can get to them.
You go down the tunnel and look around until you find the button that opens a
panel, you enter the numbers written on the map at the same time as Ron does
his, which are: 8571
The door opens and you and Ron explore until you find a metal door which must have Evelyn and Mr. Berkeley behind it! You try all the keys you have collected and luckily one of them works! WOO!
Once the door is open, Evelyn rushes out to hug you and then hugs Ron! You have a Reunion with the entire Berkeley family and explain your master plan on how to capture the Smugglers!
After that you look around and try to find something that will fix the radio.
Once you've found some vacuum tubes you arrange with everyone what they are going to do and head off to fix the radio at the boat.
First, take out the two broken vacuum tubes all the way to the right. Then, insert your two new vacuum tubes, and click on the radio again to scoot it back into the wall!
Turn on the radio by clicking and dragging the knob to the right!


We now need the frequency for the coast guard/Royal navy! We back up from the radio and now comes the exciting part!! We get to go into the door on the left!
Go in there and open the desk, there is a pamphlet on top, if you open it there is some very useful information along with the setting we need for the Royal Navy 575!
We go back to the radio and set it accordingly. You'll notice that the third band, band three there is a section which is 5.5 and 6, so what we want to do it set what would be 575!
After the radio is all set, we don't call now because the Pirates might over hear, so we head to look out point and tell Mr. Berkeley the good news about the radio working!


Once we talk to Mr. Berkeley, Evelyn and Ron, you go down to open the crate of tubing Ron needs while they finish up.
Once you've opened it, Ron walks in and you show him the tubing. Hurrah he says it will work, then while he cuts the tube you go over to open the fuel storage room!
After that you have a short conversation with Ron again and mention that you will meet him at the grotto with a surprise!
You go to the grotto, and check the generator but remember that you left the cart at the end of the tracks on the cliff! Oh joy you have to go get it and bring it back! Actually this is really fun as you get the see the large cavern again with all the smugglers storage!
Once in the cavern you can choose to go to the hatch or the door that leads straight to the cart, unfortunately none of your keys fit!
So you go by way of the hatch, make you way back to your repelling rope!
Once you repel back up which is very fun, you turn the cart around and ride it back to the light house


Then you look down again and pull the lever to go to the grotto.
After you get to the grotto you talk to Ron and take him to the other side of the island. He is going to fix his plane while you go back and finish things up with Mr. Berkeley. You turn you cart around again and head off!
We're off riding back to the lighthouse to meet Evelyn and her dad to await the arrival of the smugglers!
You talk to them about running to call the Royal navy as soon as the smugglers smash on the rocks.
We wait almost all night for the smugglers to show up and just when you're getting really stiff the light comes one!
We race to the boat and turn on the radio then go back on deck to watch for our signal.
Once the smugglers crash on the rocks just like we planned, we run below to put the call through to the Royal navy. Remember not to change any dials or you can't call until you put it back on the correct frequency, click on the handset to begin calling.
We make our mayday call twice but instead of hearing the comforting voice of the Royal navy, we hear the smugglers threats of coming after us! The only thing now is to execute plan dream gas and hope for the best. We run to the cart which is sitting at the grotto station and hightail it over to the other side of the beach where Ron is ready with his plane. We tell him what happened and prepare for take off!
the time has come, we are taking off in the plane and flying over to where the smugglers are getting off the boat onto the beach. We make several passes dropping the dream gas and it appears we take out the smugglers!
Ron lands the plane and he and you tie down the plane with a tie down anchor located under the back seat. You screw the anchor in the sand and then use your rope to tie the plane to it using a bowline knot which we learned in chapter 11.
After the plane is tied down you and Ron ride over to the grotto and head to the beach to help Mr. Berkeley, but on
your way you bump into the captain of the smugglers and watch anxiously as Ron has a battle with him, finally winning
and tying him up.
On our way out of the cave we meet Mr. Berkeley and the Captain of a Royal Navy ship called the GMS Renown! Hurray! He tells us he was relayed our message from a shore station and has thrown all the smugglers in the bring. We in turn tell of our capturing the Captain smuggler and about where all the stolen cargo is hidden. He asks us to gather our belongings because a major storm is coming but you talk it over and decide to take the chance of riding the Wanderer out. (not mentioned but Evelyn is most likely aboard the Renown talking with the very handsome Navy officers)
You fade to talking with Evelyn as Ron and his dad finish checking everything before the storm. You talk about the
mysterious checkers that appeared on the ground in the caverns, and discover that Evelyn was rolling them down a shaft in hopes of someone finding them.
You then fade to a campfire on the beach, where Jakkepoe, Evelyn, Ron and Mr. Berkeley are all talking after dinner!
After returning to the boat, the storm hits, and Mr. Berkeley asks you to secure everything below deck and put on your foul weather gear.
Head down below, walk into the bedroom and open the compartment beneath your bunk. There you'll see your foul weather gear. Put it on, and then head back up on deck!
The ship dislodges from the rocks, and The Wanderer is afloat and sailing back to civilization! Jane writes about the adventure and everything that happened, and mentions Jakepoe is back home now and has a cute girl koala he likes.
She writes more but I don't want to spoil it.
Congratulations sleuthers! you did it! Nice work and now you're next adventure which would be "Trials Of Salem!" Good luck!

Comments